FO: The Turtle Hat

I swear one of these days I’ll catch up on photographing my newer projects and current WIPs so I can share. Until then, have another project from last Christmas. 😉
Today’s project is The Turtle Hat. If you guessed that this hat was a gift for anyone other than my father-in-law, you would be wrong!

To give a little background on this project let’s rewind to Christmas of 2014. My father-in-law saw the crocheted helmet that I made for T and requested a turtle hat. Because y’know… Helmet, turtle hat. They’re almost the same thing.
That’s the short story, but I feel like I should mention that he was very specific about it. He told me in great detail that the hat should be the body of the turtle and it was necessary that it have a cute, floppy head and legs.

IMG_1618_medium2

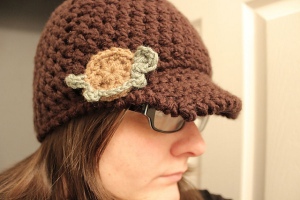
I wasn’t very confident in my crochet skills at the time so for Christmas that year, I made him a hat with a turtle applique on it as a stand-in until I felt like I could pull off the ultimate turtle hat. (Check my entry here for more info on that.)

I let my desire to make a real turtle hat simmer for a few years until I felt confident that I could pull off what was asked of me. The biggest decision I had to make with this project was whether I should make the head and legs in a tube shape and stuff them. I was worried that they would get in the way more than anything, so I ultimately decided to do the cute little flaps instead.

Another design decision that I was unsure about was how to create a turtle shell texture. I almost made individual pentagonal pieces to attach to the hat, but I thought that would make it too heavy and/or stiff. It would also be much more time consuming than I was prepared for. Surface crochet it is!

And that’s how I ended up with this fella.

IMG_3703

I’m really proud of how he came out considering I created this pattern on the fly. There are a few things I might do differently, if I made it again.

  1. I would make the inside lines thicker. I did a double line on the bottom, but I did single lines on the inside. (Or I might even do the idea with the pentagonal pieces sewed on and then surface stitch across the seams.)
  2. I would make double the amount of flaps and stuff them lightly so they would have a little more dimension.
  3. I would make the surface stitches looser. I made them loose enough where the hat would still stretch, but there was a little bit of an issue with the fit being a hair tight around the bottom band.

As with the last project, I still have the pattern notes so if anyone would like to see a pattern written for this, let me know in the comments! 🙂

Thanks for reading! xoxo

FO: Color-block scarf

Hello, all! I have another 2018 gift to share with you today. It’s unique in that it’s a design that I threw together myself. I was trying to find a gift idea that was practical yet classy for my mother-in-law. I went through some patterns on Ravelry, but couldn’t quite find what I was looking for. Thus, the “color-block scarf” was born! (I know. Catchy name, right?)

IMG_3695

I got some info from T about what her favorite colors were, and after careful deliberation, I decided to combine them via color-blocking. The idea behind this was that it would, hopefully, help the scarf to go with multiple outfits as she could wear whichever color matches on the front/top of the scarf. She wears red often so the goal was to give her a fun accessory to match.
I was also a little worried with the red once I started working with it. It definitely needed some other colors to tone it down a little bit. It’s like… Violently red.

I really like the fabric made by this stitch so I’m already planning on using it again on a future project. Maybe another version of the scarf, but striped or solid color would be nice! I have so much yarn sitting around, I’m sure I could come up with something. (At that point would it even still be called the “color-block scarf”!?)

I think I still have the project notes for this somewhere so if anyone is interested in having the pattern, leave a comment below and I’ll cobble together a readable pattern from my coded notes! 🙂

(They’re not coded. They’re just chicken scratch and only I can read them.)

I’ll be back in the near future with other yarny news. Thanks for reading! ❤

One year later…

…Or close enough anyway.

Hello hello hello, everyone! It’s been entirely too long since I’ve updated. I’ve had so much going on this past year. Unfortunately a lot of it bad, which is why I’ve taken this unintentional, but sorely needed hiatus. Most things have been taken care of now, so I think I’m ready to jump back into blogging!

Today I want to share a project from my Christmas gift frenzy last year. I spent the last 6 months of 2018 (and a few months of 2019!) making gifts for all of T’s family and for some of our friends. I thought it’d be nice to share them a little at a time over the next few weeks.

Let’s start with my favorite gift project of 2018: Ravenclaw Quidditch Gloves by Jolene Meurer!

IMG_3866

As you can see, I opted for Slytherin colors over the original Ravenclaw as the person I gifted these to prefers Slytherin. Do not be alarmed! I’ve already bought the yarn necessary for knitting a Ravenclaw pair for myself. 😉

These gloves were supposed to be just a quick project, but I had to make some major alterations to get them to fit and look right. I followed the directions as written in the pattern the first time and ended up scrapping that glove entirely. It was way too small, and the glove pulled awkwardly toward the thumb, making them uncomfortable to wear.

For those of you who may want to make gloves closer to what I made, I’ve listed my alterations/choices below!

  • Knit Chart B at least 5 times. If you want a longer glove than in my pictures, 6 times should be adequate. (The pattern recommends 4 – 5, but 4 is so short that it will ride up onto your palms. Or it did for me.)
  • After knitting Chart D/C, knit Chart B once more.
  • When working the thumb portion, I slipped the 9 sts onto a scrap piece of yarn and followed the chart until the next round. When I reached the thumb gap in the next round, I CO 9 sts and continued according to pattern for the rows afterwards.

IMG_3858

The main thing that helped with the fit of the glove was including Chart B between Chart C/D and Chart A. The weird pulling in the thumb seemed to be caused by the shortness between the top ribbing and the thumb hole. Even if you don’t follow any of the other alterations, I would highly recommend that one.

Also, it’s probably just a lack of understanding on my part, but I didn’t know what she meant with her instructions for the thumb holes. I ended up substituting my own method that made sense for me. If anyone else decides to make these gloves and understands what she was going for, leave me a comment and teach me your ways! 😀

I’ll definitely be back to post the version that I’m making for myself. I’m thinking I’ll go for the film version blue/silver, and I’ll make the stripes a bit larger! Until then, I’ll be back soon to share more 2018 holiday projects!

Thanks for reading! xx

You spin me right round

With all the talk of the Tour de Fleece lately, I thought now would be a good time to share some of my spinning adventures. I wrote an entry quite a while back sharing my experience with building a DIY spindle. I couldn’t wait to give it a try, so I went to Knit Picks and grabbed a pack of their Bare Wool of the Andes roving.

IMG_2308-2

My first spinning attempts were awful. I ended up with a blobby, unusable mess that couldn’t have been salvaged even if I wanted to try. I was a little discouraged so I shoved my roving and spindle into the back of the closet. I knew I’d eventually be bitten by the bug and want to try again so I let myself forget about it for a few months. Sure enough, I saw some handspun yarn on Instagram and that was the inspiration I needed to break out the roving and spindle again. The thing that amazed me the most with this second attempt was that, despite not working on it for months, it was actually okay! I guess the months of letting the spinning knowledge stew in my brain really helped? (Does that even make sense?)

Unfortunately, I don’t have any pictures of my first spinning attempt. (I threw it away to run away from the failure, ha ha!) The second attempt was definitely better though! It was thicker than I wanted, sure, but it was more consistent. Once I got the hang of it, all I wanted to do was keep spinning. In fact, I spun half of what I had before I even noticed!

IMG_2828-2

Eventually, I went online and bought a new spindle. I suspect that my little DIY spindle isn’t balanced very well so I wanted to try something that was professionally made. It was a little overwhelming looking at all of the spindles available, but I finally decided on a Schacht Hi-Lo spindle. I liked that I had the option of spinning high or low whorl, and it had good ratings. I used up the last half of my roving the first day it arrived, and it was my best spin yet, though it wasn’t great by any means. But you know what, that’s fine. It was just cool to know that I’m capable of getting better at this after that terrifying first attempt.

My latest goal is to try plying my little pile of singles into a finished yarn. I’m also wanting to give dyeing a try so I’ve been doing a lot of reading on that. I think my first attempt will be dip dyeing, but I’m really excited at the prospect of handpainted yarn. It’ll be a while before I’m feeling confident enough to try that, but until then, I’m going to have a lot of fun spinning my own special yarns.

IMG_2829-2
Close up of my latest spin

I’ll definitely be back to talk about my plying and dyeing attempts, but until then feel free to leave me a comment and let me know if you’ve ever tried handspinning or dyeing your own yarn. I’d love to hear any stories you have about your first attempts.

See you next time! ❤

Find me on Ravelry!

I’ve been using Ravelry since I started knitting back in 2014, and it’s seriously been a lifesaver. If you haven’t heard of it, Ravelry is a website for people who are into fiber arts. You can log your yarn stash, find patterns, make a list of future projects, keep track of your current or past projects, and connect with other yarny people. It’s really been so helpful for me to have a resource like that to keep track of all these things. I really recommend it. </fangirling>

So why are we talking about Ravelry? I hear you ask. Let me get straight to the point.
In the past few years since I started this blog, I haven’t publicly shared my Ravelry account. I wasn’t hiding it or anything, and several clever readers were able to find me quite easily, but I just hadn’t thought about sharing it. Until today.

So that’s it. I just wanted to share my links with fellow Ravelry users. If you want to check out my current and past projects or my library, feel free to visit my profile page and don’t be afraid to add me, if you’d like! 🙂

For those of you interested in my patterns, you can find my designer page too! I’m actually working on two new patterns right now. One of them will hopefully go up within the next few weeks so keep an eye out for that.

I’ll also be adding some links in the sidebar somewhere so anyone can find me whenever they need to.

Thanks for reading this rather pointless entry. I promise I’ll have something better to talk about next week. 😉